Extron DVS 605 Part 3
Extron DVS 605 (Part 2)
Extron IN1606 (Part 1)
Setup required: Scroll down for the tutorial.
Availability: Second-hand online, can be found cheap
The Extron IN1606, DVS 605 and DSC 301 HD are 3 of several scalers on the Product Configuration Software (PCS) list that can output 240p using a custom EDID.bin file. To upload an EDID file, use the PCS program using the provided link which does not require a sign in (FW 4.7.1): https://www.dimedtec.de/downloads/Extron/PCS/
In my first attempt at creating a 240p EDID, the vertical frequency was sub-60Hz and caused noticeable frame skips. However, there is a pre-made 240p EDID for RGB output thanks to Filthy Pants, which should output 60Hz. Altering or creating a fresh EDID file will require a third party program or the official Extron EDID Manager.
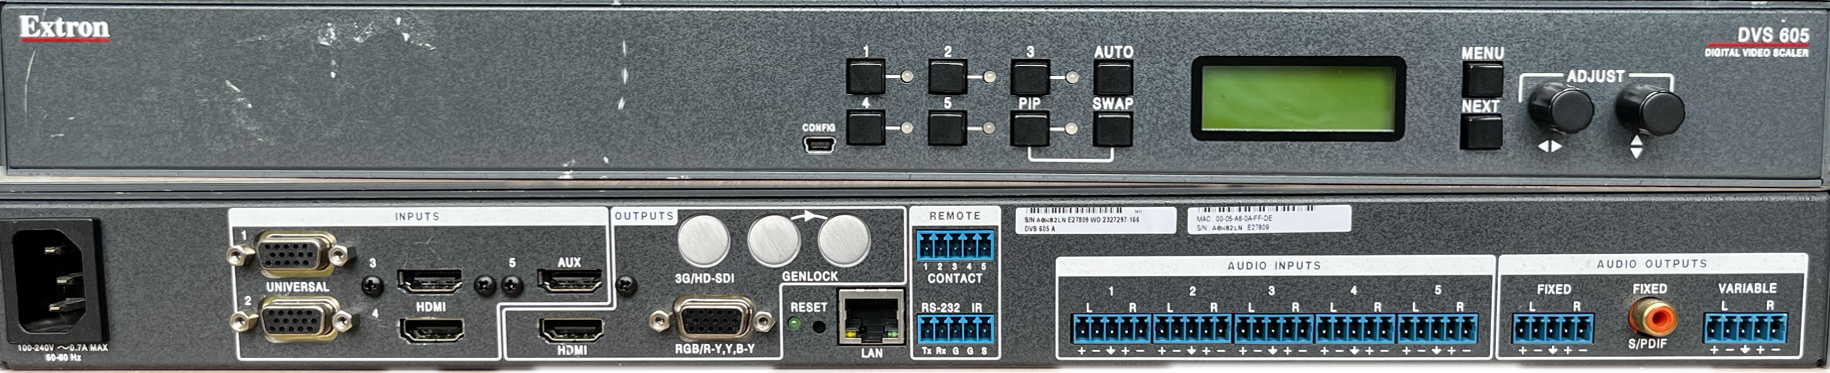
Front and back of the DVS 605 A
The DVS 605 is versatile for downscaling all video sources, with 3 HDMI inputs, 2 DE15 connectors which can accept composite, S-Video, component, and RGB. Analog RGB or component can output via DE15, and there is a digital output via HDMI for simultaneous downscaling. Keep in mind that I could only get the HDMI output to sync to a CRT if I ran the output of an external DAC through an Extron RGB interface, and that even the DVS 605’s may require an Extron RGB Interface to output legible sync. The IN1606/1608 has the same inputs as the DVS 605, but as it only has HDMI output, it will require a DAC and RGB interface. It is worth noting that the IN1606 could not output 480i without significant horizontal jitter on a BVM D20F1 (DAC required), but worked on a JVC DT-V1710CG. Also worth noting for the DVS 605
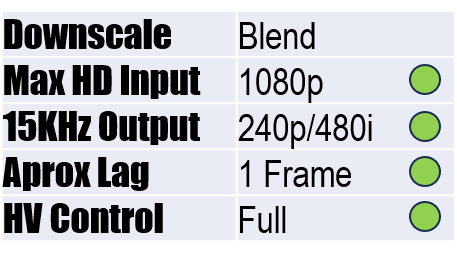
The DVS 605 is very flexible with input resolutions up to 1080p, and can output 240p and 480i. On the DVS 605 with AFL turned on, progressive inputs have 17msec (1 frame) of lag, and 33msec (2 frames) for interlaced (thanks to ShankMods for pointing this out). In contrast, the IN1606 only has 0.2-1.3 frames of lag for progressive inputs and 1.25-2.25 frames when downscaling 480i sources.
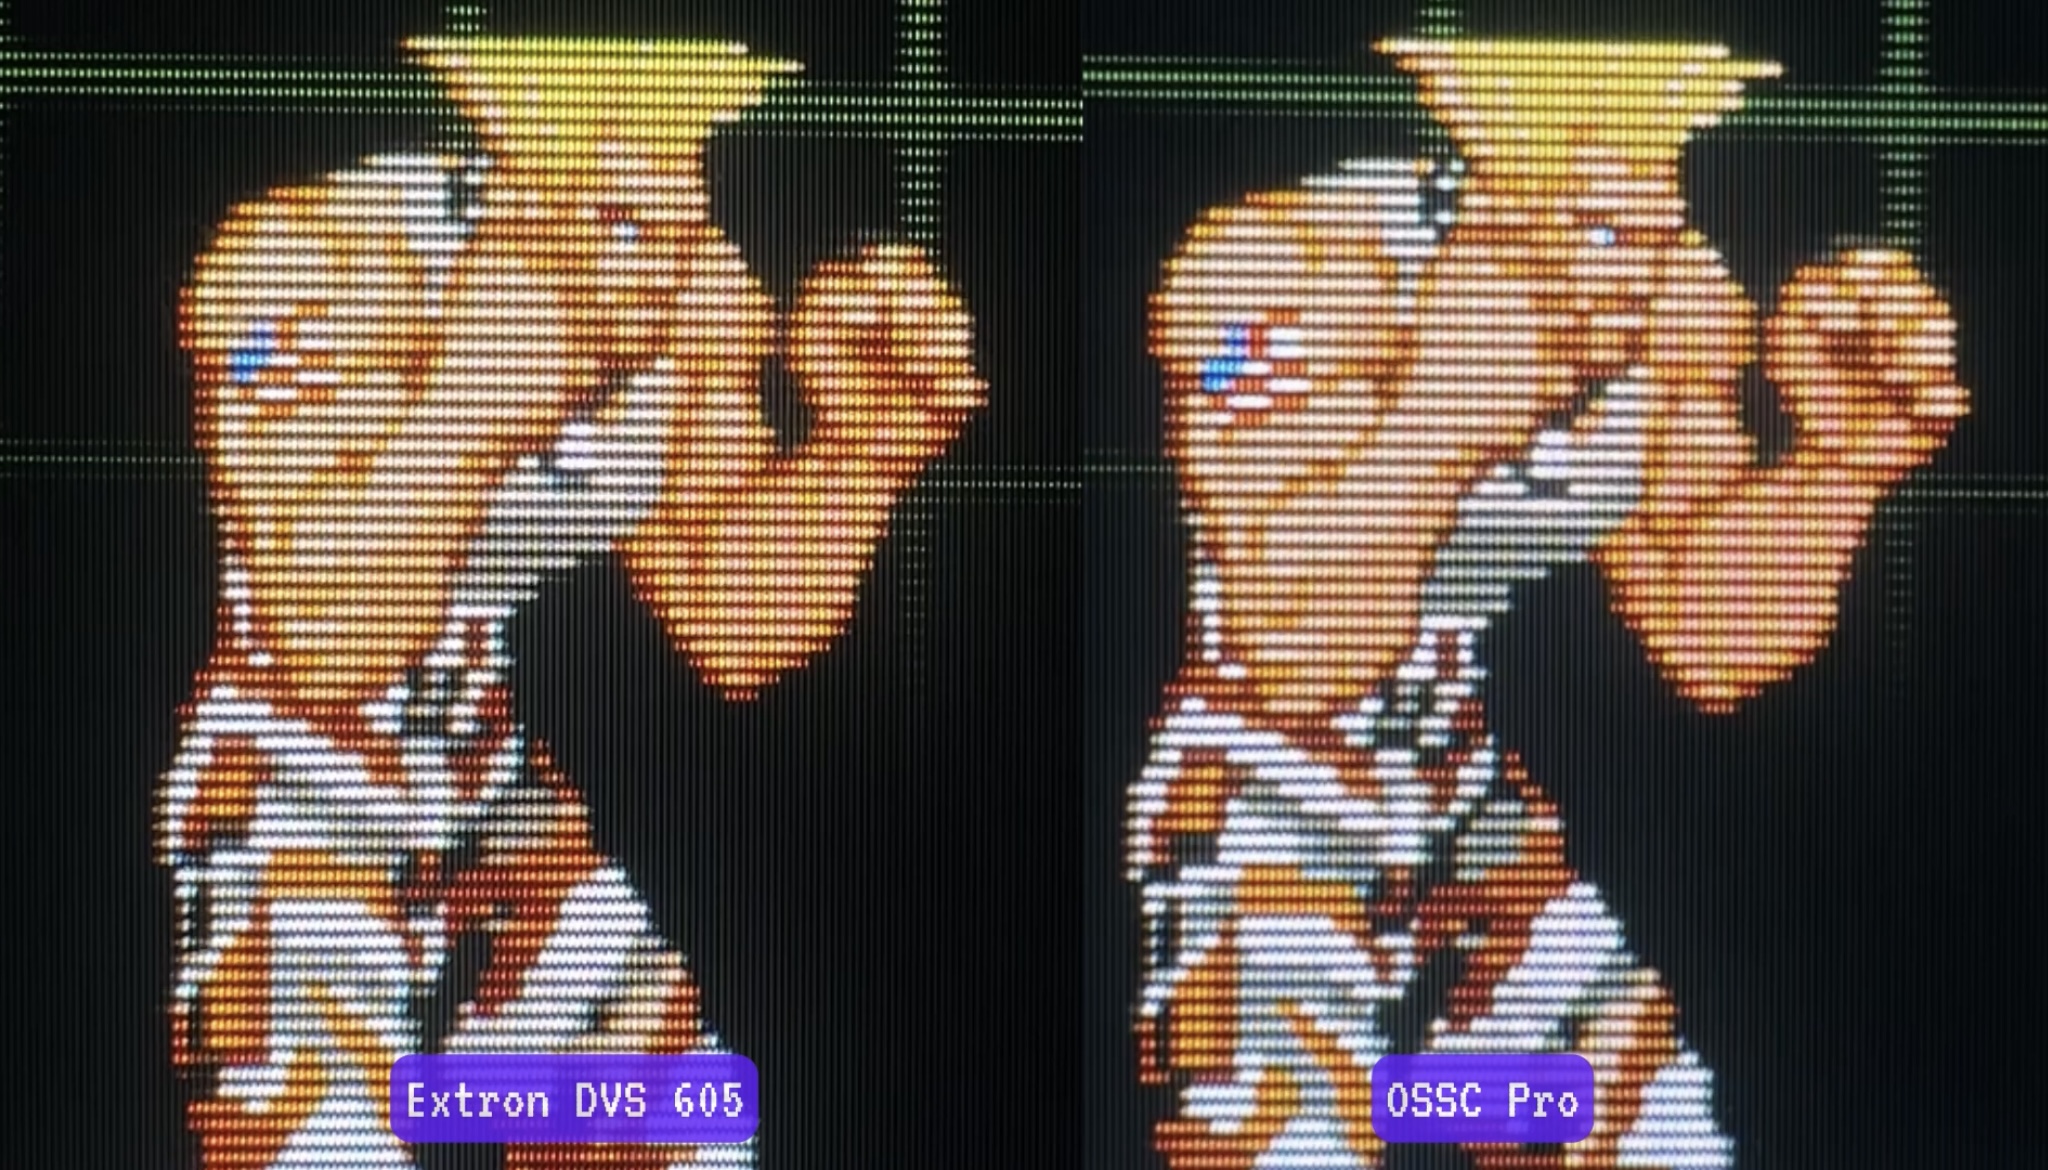

Blending vertical lines with a fine balance of sharpness and detail helps mitigate vertical shimmer for non-240p 2D pixel art, reduces jaggy outlines of linear and 3D geometric shapes, and can restore 240p on-par with a line decimator like the OSSC Pro. It also surpasses the Corio2 tvONE 750 for image clarity and picture controls, with fluid HV positioning and image presets/recall function.
In summary, the Extron EDID Method of downscaling can be a viable option for anyone with a compatible scaler, provided a link to the PCS software remains available which does not require a login. I recommend the DVS 605 as a 240p/480i downscaling powerhouse.
Verdict: Recommended
DVS 605/EDID Method Set Up Guide for Downscaling
Requirements for programming:
– USB Mini cable- PC with the Extron Product Configuration Software (PCS). No-sign in, free download version available here: https://www.dimedtec.de/downloads/Extron/PCS/
– Extron DVS 605 or compatible scaler on the PCS list. Other scalers will need a DAC to display on a CRT, and the same reliability and functionality as the DVS 605 cannot be guaranteed. The IN1606 and DSC 301 are reported to work with mixed results.
Install the PCS and connect the DVS 605 by USB mini. In the PCS, go to the second tab titled ‘EDID Minder’. Custom Resolutions are located in the table on the right labelled ‘INPUTS’. The Extron DVS 605 can take up to 5 custom resolutions via EDID.bin files. The first 2 slots are for VGA EDIDs and the next 3 are for HDMI/DVI. The EDIDs are just software-embedded with a connection type, and the DVS 605 can output any of the 5 custom resolutions to any physical output.
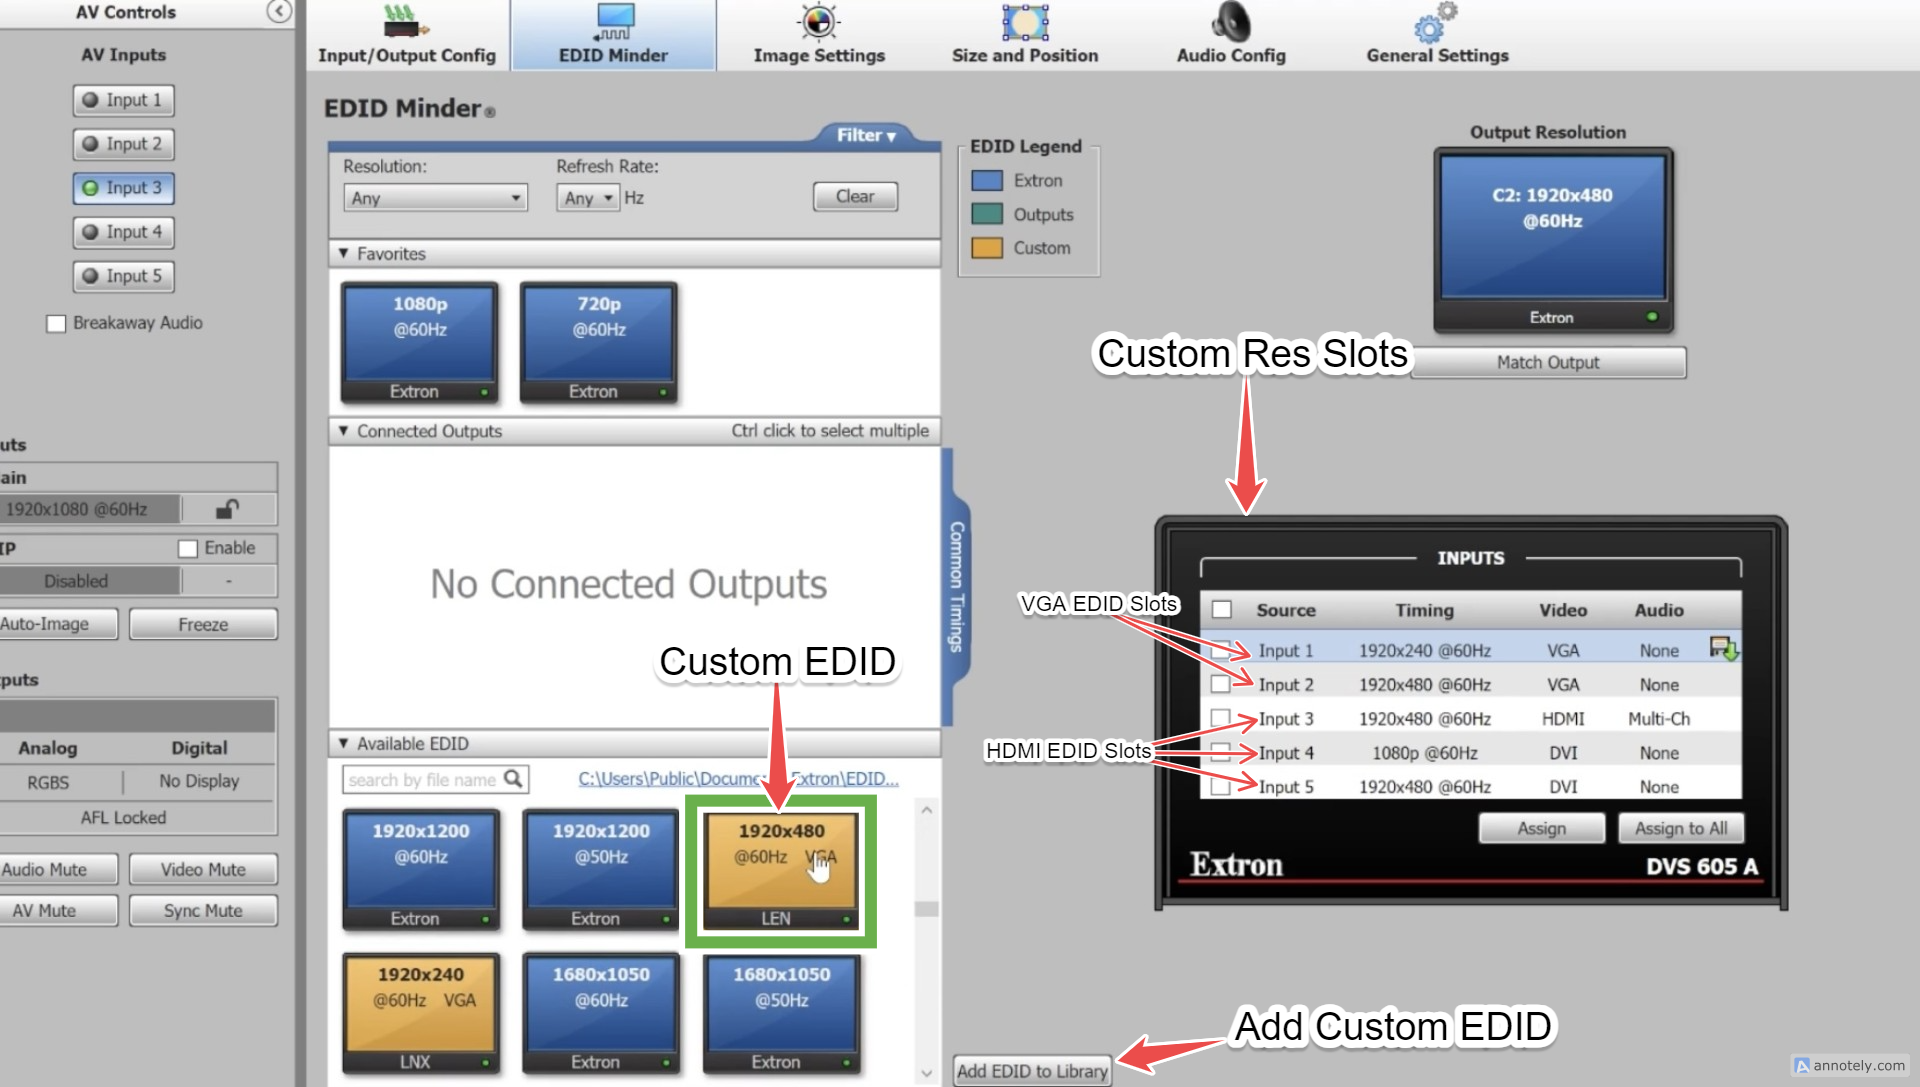
Download the DVS 605 CRT Res folder and click ‘Add EDID to Library’. The folder contains 2 sub-folders; VGA and HDMI. They both contain the same resolutions, just programmed with different headers seen by the PCS. Import up to 2 VGA EDIDs from the VGA folder and 3 HDMI EDID from the HDMI folder. For 15KHz output, I recommend these:
- 1920x240p for 240p 60Hz
- 640x480i for 480i 60Hz
- 240pWS for letterboxed 240p 60Hz on 4:3 displays
- 360iWS for letterboxed 480i 60Hz on 4:3 displays
Drag and drop the 2 VGA resolutions to slots 1 and 2 one resolution at a time. Do the same for the HDMI resolutions to any of the slots 3, 4 or 5. Sometimes the DVS 605 shuffles the order. Custom resolutions are labelled C1-C5 in ‘OUTPUT CONFIG’ -> ‘RESOLUTION’. Set the output format to the type of RGB sync needed for the display, or select .YUV-bi-level’ for component. Turn ON ‘GENLOCK/AFL’ to reduce lag to 1 frame.
For 1920x240p, the picture will be dark and strobing with discolouration. Navigate to ‘PICTURE CONTROLS’ on the DVS 605. I recommend reducing H Size to about 1500, and V Size to 230. Then centre the picture with H and V Pos. For Auto-recall of these settings, navigate to ‘ADVANCED CONFIG’, Turn ON ‘AUTO IMAGE’ an set ‘ASPECT RATIO’ to FILL. Then save the settings in ‘USER PRESETS’-> ‘INx SAVE’. I’m still trying to make a 240p EDID where you don’t need this step. 720/640x240p works fine on my PVM L5 but my D-series BVM cannot sync. I’ll update if I get it working.
EDID files were first made in Custom Resolution Utility (CRU) using CRT Timings. CRU EDIDs are saved as DisplayPort, and I used the Extron EDID Manager (sign-in required to download) to save as VGA/HDMI, as well as enable audio and CE output timings so the user can select resolutions to output from the console/media player. I found this method to have the most stable results, though anyone can experiment with any EDID manager software.